

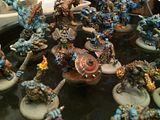
Image taken from The Dornian Heresy. Property of the original artist. All rights reserved.
*
Retribution from the Blood Angels was swift and entirely without warning. As soon as the Blood Angels Strike Cruiser Vangelus emerged from the warp it powered up its weapon batteries and proceeded to pummel the flotilla of ships in orbit around Antissa IV. The enemy flotilla was made up on the most part of small escort ships gathered around the flagship of the rogue Wolf Lord Vandrad Gorebeard, a Strike Cruiser named Wulfen’s Fang. Some of the smaller ships peeled away from the battle as it erupted, clearly favouring their chances in fleeing to the Maelstrom rather than staying to face the wrath of the Blood Angels. The Vangelus ignored the smallest ships slinking away from the combat; instead it focussed its attentions wholly on battering the void shields of the Wulfen’s Fang and neutralising those escort ships that it considered a potential threat.
Vandrad Gorebeard and the Great Company he’d taken with him were reavers. Formally of the Space Wolves they’d descended to piracy and chaos worship. They had a long and bloody history and were certainly no slouches when it came to void warfare. However, the suddenness and ferocity of the assault caught them off guard. To make matters worse the Wulfen’s Fang was operating with a skeleton crew, the most part of its personnel planet-side with the Wolf Lord. They were severely outmatched before they’d even realised there was a battle.
The fury of the Blood Angels was to be expected. Vandred’s fleet had been a constant threat to shipping within Blood Angels protected space and on two separate occasions had engaged and captured Gladius patrol ships previously belonging to the Blood Angels. Vandrad Gorebeard though hadn’t expected the Blood Angels to seek to settle the score quite so soon.
A final barrage of fire saw the Wulfen’s Fang’s bruised void shields light up in one last protest before they collapsed entirely, leaving the Strike Cruiser prone. The Vangelus wasted little time in firing a salvo of boarding torpedoes as soon as their sensors picked up the failure of the opposing ship’s shields. At the same time a swarm of Thunderhawk Gunships spewed from The Vangelus’ flight deck making their way to the surface of Antissa IV, or Niflheim as the Space Wolves had 'affectionately' taken to calling it after the mythical land of Fenrisian legends.
The defensive weapons of the Wulfen’s Fang attempted to thin the numbers of the boarding torpedoes. A great many were cut down in the scything tracer fire, their power armoured cargo spilt out into cold of the void. A significant number managed to evade the attentions of the servitor-manned guns and breach the vessel though.
Trusting the capability of the boarders it had dispatched the Vangelus was able to turn its full attention to eradicating those escort vessels that still remained to put up a fight. Many of the Gladius class escorts had engaged in the sport of shooting down as many Thunderhawk Gunships as their targeting systems could lock on to but the Vangelus responded with all the fury of an enraged larger sibling protecting its kin and ensuring enough of the flight of Gunships would survive to make planet fall.
*
Hauk Greyfell growled with bestial rage. It was a primal sound that sent chills down the spines of those humans Kaerls still serving on the bridge crew.
“All hands, repel boarders!” he snarled over the vox. He was not going to surrender Lord Vandrad’s ship willingly.
The air on the bridge grew charged as Hauk activated the power-field on the vicious Wolf Claw on his right gauntlet. He snapped orders to the Wolf Guard Terminators stood at the bulkhead leading off the bridge and then turned back to the bridge crew.
“Seal all the bulkheads!” he snapped. “And if you open them for anyone but us I’ll come back and cut your threads myself!”
As he led his personal guard through the corridors of the command deck he savoured the growing hunger within himself. His muscles ached to begin the murder-make. It felt like an age since he’d enjoyed the rush of battle, the delicious scent of blood in the air and the coppery tang of it on his tongue. The auspex scanner one of his guards was carrying chimed with a contact. He quickly picked up his pace, pounding down the corridors the sound of his footfalls like peels of thunder. He let out a blood-curdling howl that echoed menacingly within the confined walkway even more so when the Wolf Guard picked up the howl too. They would place a great many skulls at the foot of the Blood God’s throne today.
Scenario 1: Boarding Action
The Blood Angels boarding parties on the Wulfen’s Fang are looking to destroy key systems to remove the threat the Strike Cruiser poses to their own ship the Vangelus and to the forces being deployed on the planet. Those Space Wolves still on the Wulfen’s Fang are hurrying to repel the boarders whilst maintenance crews work to reactivate the ship’s void shields and ready it to respond in kind to the Vangelus.
FORCE SELECTION
There is no force organisation chart for this battle. Units can be chosen freely from the army list up to 750pts.
Forces should be chosen from their codex as normal with the following exceptions:
• Units may not select Dedicated Transport options.
• No unit may have a starting size greater than 10 models, before being joined by Independent Characters.
• Units must not have models on a base size larger than 40mm
For this battle the Blood Angels are the attackers and the Space Wolves are the defenders.
TABLE SET-UP
The Wulfen’s Fang is a tangled labyrinth of passageways and chambers and should be represented appropriately. The board may be either laid out in an agreed fashion or the players may take turns placing board pieces so that they take up the playing area, making sure that each table edge has at least one clear entry/exit point. The defender will pick one room towards the centre of the table to represent the bridge of the Wulfen’s Fang. All bulkheads on the board follow the rules for controlled bulkeads and are controlled by the defender.
SABOTAGE
The Attacker’s goal is to destroy vital systems within the Wulfen’s Fang. The Defender places D3+2 sabotage objective markers on the table. These markers represent control panels and systems junctions vital to this area. The markers may be placed anywhere on the table other than within 6" of an entry/exit point or 12" of each other. They also may not be placed in impassable terrain. One marker must be placed within the bridge representing those systems and controls key to getting the Wulfen’s Fang battle ready once more.
The Attacker must attempt to destroy these objectives by any means they can. Each has an armour value of 11, and will be destroyed by any successful glancing hit or penetrating hit scored against them. Because their Attackers cannot be certain of destroying them properly at distance, these objectives count as having a 4+ Invulnerable save against any shooting attack or blast damage they suffer and cannot be harmed by events on the Catastrophic Damage table.
At the end of the game, the Attackers gain 1 Victory point for each sabotage objective destroyed, and the Defenders 1 Victory point for each sabotage objective still on the table. The side with the most Victory points is the winner.
DEPLOYMENT
The defender places one unit within 12” of the room designated as the bridge of the Wulfen’s Fang, Hauk Greyfell must join this unit and be deployed with it. The attacker then chooses an entry point and ‘deploys’ a unit ready to enter the table from that entry point on Turn 1. The defender chooses another entry point and ‘deploys’ a unit to enter from there on turn 1. The attacker and defender keep choosing entry points alternately from here on until there are none left. The defender cannot deploy any more units to arrive on turn 1 and must wait for them to arrive from reserves. The attacker can deploy one unit per entry point chosen as their own but does not have to. Any units not deployed from either side are held in reserve.
Reserves arrive normally, entering the board from any entry point under that player’s control.
FIRST TURN
The attacker gets the first turn. In the first turn all units that were deployed ready to enter the board move onto the table from their chosen entry point using the normal rules for reserves.
ENDING THE GAME
The game has a variable game length as per a Standard Mission (see page 90 of the Warhammer 40,000 rulebook).
WIPE-OUT!
Regardless of any other condition, if at the end of the game your enemy has no units left on the table then you are victorious!
This scenario uses the following special rules:
BULKHEAD DOORS & AIRLOCKS
Chambers and corridors may be sealed off by the use of armoured bulkhead doors and airlocks. These doors may be locked, accessible or controlled. These doors should be represented on the table and moved to show whether they are open or closed at any given time. A closed bulkhead door blocks line of sight and assaults may not be made through them.
• Locked: A locked door is inaccessible except by destroying it or forcing or overcoming the lock in some way. In most cases only direct force will do. Once a bulkhead door has been destroyed, remove it from play.
• Accessible: An accessible door may be either opened or closed by the first unit that moves into contact with it in a particular turn, allowing a unit to pass through it, or shut it behind them. A bulkhead door may only be used once per turn (either opened or closed), but may be destroyed at any time.
• Controlled: In the case of a particular door or doors being controlled by one side in the game (as might commonly be the case where one side represents a force defending the Zone Mortalis area from an attacker), the side which controls the doors treats them as accessible by their units, but units belonging to other forces treat them as being locked.
Destroying Doors: Bulkhead doors and airlocks are armoured and reinforced structures and therefore difficult to destroy. All bulkhead doors and airlocks are treated as being Armour Value 13, and require a single glancing or penetrating hit to destroy.
RESERVES AND DEEP STRIKING
The rules for Reserves, Scouts and Infiltrators remain unchanged, but entrance and exit points are the only way these units can enter the Zone Mortalis.
Only units which are described as being able to teleport or materialise from the Warp may use the Deep Strike special rules. Any unit that deep strikes into a bulkhead suffers a Deep Strike mishap – this makes deepstriking into a Zone Mortalis a dangerous proposition!
Barrage weapons cannot be used to fire indirectly within, into, or out of Zone Mortalis areas at all; only direct fire can be used.
FIRESTORM & SHRAPNEL
The confined spaces of the Zone Mortalis can prove to be death traps to the unwary and certain types of weapons have their effectiveness increased by the environment, while others become more unpredictable.
Weapons with blast markers and templates may re-roll failed rolls to wound inside the confines of a Zone Mortalis, reflecting the lethal effect of explosives, flaming liquid and shrapnel in confinement. Additionally, if a Scatter roll takes a blast marker’s centre point into contact with a bulkhead wall, it detonates on contact with the wall; resolve the weapon’s effect from this spot. The portion of the blast that crosses and lies beyond the line of the wall is lost.
NOWHERE TO HIDE
Units that break and flee from combat within the confines of a Zone Mortalis are far more likely than in most games of Warhammer 40,000 to be trapped in areas where their avenues of retreat are entirely cut off, and due to the confusion of corridors and passageways that may surround them, falling back may be a particularly deadly affair.
Contrary to the usual rules for falling back, immediately on failing a Morale test, a unit’s first fall back move is directly away from the enemy, and subsequent moves are towards the nearest exit unblocked by the presence of enemy models. If a unit is trapped while falling back by enemy models and cannot escape, then it is immediately destroyed.
Blind Panic: If while falling back a unit moves through (i.e.within 1" of) another of the player’s own units, the unit moved through must take an immediate Morale test or fall back themselves. Fearless units are not subject to this.
REACTION FIRE
The confined spaces of a Zone Mortalis make for deadly, close range fire-fights, where a split second reaction may be enough to gun down an enemy rushing out from the darkness before death strikes you down. In order to represent this, this special rule allows units being assaulted a chance to fire their shooting weapons when they are assaulted — if they’re fast enough!
• Only units not already engaged in close combat may attempt reaction fire.
• Only pistol, assault and rapid fire weapons may be used for reaction fire attacks. Heavy weapons may only be used for reaction fire attacks if the model carrying them has the Relentless special rule.
• A unit may only make a single reaction fire attack against the first unit they are assaulted by in any given turn.
• A reaction fire attack is made after an assault is declared, but before assaulting models have moved. Casualties resulting from reaction fire may cause an assault to fail.
Making a Reaction Fire Attack: In order to make a reaction fire attack, the unit in question must first roll equal to or under its majority Initiative score on a D6. If successful it may fire its weapons at the assaulting enemy, just as it would in the Shooting phase but at -1 BS (minimum BS 1). Template weapons are used as normal if the Initiative test is successful.
A unit may not use the Counter Attack special rule if it has used reaction fire.


0 comments:
Post a Comment