
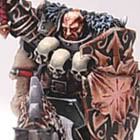
I've built Brother-Slaughterer Markard mostly because I was asked to do a quick tutorial for someone on how to pin minis and the parts to build him were close at hand. He still needs a little tidying up.


Pinning is really useful for strengthening joins, especially on metal or hybrid metal and plastic minis where the weight of the individual parts can make it difficult to get a strong and durable bond with just glue.
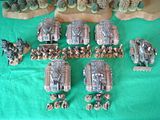
What you'll need:
A mini...
Hobby drill
Pinning wire or paper clip
Wire cutter or clippers etc.
Glue (not pictured)

In this example I'm going to pin a chainfist arm to the terminator's torso (didn't need pinning but I needed to build the mini...)
Firstly, drill a hole in the torso where the two parts will connect together. I use a 1mm drill bit as this is the perfect size for the paper clips I use to pin the minis. I drilled the hole about 4mm deep in this case but basically, drill as deep as you feel you need to and obviously be careful not to ruin a mini by drilling too far. If possible try and get at least 3mm or so so that there's enough of the pin in each piece to make the join strong (and also to stop you having to work with an especially fiddly little pin if you don't have to!). It's nice and easy with plastic and resin minis but takes a bit more effort with metal parts.

Now if you cut down a paper clip to the size you'll need it to be to pin into both parts of the mini. This doesn't have to be exact at this stage as you can always go back and trim it down once you've drilled both parts. This is easily done with wire cutters. Of course, make sure you do this away from you and carefully, the last thing you want is a tiny metal pin pinging about all over the place!

Now if you glue one end of the pin into the hole you've already drilled.

The next part is to drill a hole for the pin in the other part of the mini, in this case the arm. You can either guess this one, generally it isn't too difficult to work out where the second hole should go to line up with the first. However, if you want to be a bit more exact I find it helpful to draw on the end of the pin with black ink or use black paint and then try a sort of dry-fit of the mini and you should be able to get a mark roughly where you need to drill.

Drill where you've marked out deep enough to fit the other end of the pin (or cut the pin down if there's too much of it still)

Then if you apply glue to both the pin and the connecting parts of the mini they should stick together really well and form a strong a durable bond.

Beyond strengthening joins pinning can be great for conversions and the like, it can be used to create gaps in a mini and/or as a frame to build up from with green stuff etc.
Hope that's of some help!


0 comments:
Post a Comment