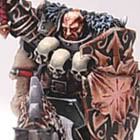
I was asked on Warseer to do a step-by-step of how I paint the bone coloured armour on my Warriors of Chaos. I wasn't going to post it on here but then I thought it could be quite handy for others, it doesn't have to be for WoC. With the multitude of 40k painters out there (I think most of my blog followers are 40k gamers first and foremost) it might be of use. Maybe for a darker, grittier Deathwing etc. I originally intended the colour scheme for Chaos Space Marines way back when and still think it'd look awesome on them.
How To Paint A DevoteeStep 1: Undercoat in Khemri Brown. Mine is very watered down so it takes 2 coats but gives a nice smooth finish.
Step 2: A drybrush of Bleached Bone. It's a fairly heavy drybrush to make sure there's plenty of paint coverage but not so much paint that it no longer has that dusty look as you apply it.
Step 3: Gryphonne Sepia wash. There's nothing fancy about this, just a wash all over the armour. As this is a rank and file mini I applied a second wash once the first had dried (second picture). For a character I'd maybe only do the one wash to keep the colour a little brighter.
Step 4: Gryphonne Sepia is used again but this time for shading instead of to alter the colour. Painted into all the recessed areas of the armour. For example: Under the cheek ridges of the helmet, around rivets, the grooves in the knee armour, where the armour meets the belt, animal skull, lapel bits, shoulders around the cloak, where the extension of the helmet that holds the horns joins joins the helmet proper. Any areas that are next to a raised edge need to be shaded and obvious areas where there'd be less light such as the back of the helmet below the level of the cloak.
Step 5: Edge highlight. Bleached Bone again here. On all the raised areas and edges of armour plates. Normally I wouldn't do this until I had painted the rest of the mini as I can easily correct any mistakes from earlier at this stage.
There you go, not a brilliant tutorial as I rushed this Warrior a little but I hope it's helpful to anybody who is interested. I'm far from a great painter so if anybody has any better methods or just general advice I'd love to hear it.


3 comments:
That would make painting lots of Deathwing easier. I'll have to give it a go when I get to my old metal Termies sitting in my painting queue.
Muahahhaha! Your secret is now known to me! Muahahaha!
...
Uhm, thanks for the tutorial, it gives really good results. Cant say I'll use it for my current WoC army, as it doesn't fit the theme I'm running, but who knows what the future might bring?
Either way, give us a picture of the finished Warrior when you get there, as it's always nice to see how it fits with the rest of your palette.
Thanks for your comments guys.
Consadine: Glad it might be of some use to you! :)
Noeste: I'll be sure to post pics of the finished Warrior, going to do some more painting for the rest of his unit over the weekend hopefully. Then I'll get back to the Mordheim Warband and the BSB but fancy doing a unit first!
Post a Comment